
Getting Started with Foundry Local & Semantic Kernel
Hi Everyone! This post is continuation of a series about Semantic Kernel. Over the time, I will updated this page with links to individual posts :
Getting Started with Semantic Kernel (Part 1)
Getting Started with Semantic Kernel (Part 2)
Building Blocks of Semantic Kernel
This Post - Getting Started with Foundry Local & Semantic Kernel
Getting Started with Ollama & Semantic Kernel
Getting Started with LMStudio & Semantic Kernel
So far, we have discussed theorical aspects of Semantic Kernel. In this post, we will focus on practical aspects of using Semantic Kernel with Foundry Local.
Initially, I had a plan to start this technical part with Ollama and LM Studio. However, I have decided to start with Foundry Local, as this is something Microsoft just announced in Build 2025. You can find more information about Foundry Local here.
What is Foundry Local?
Foundry Local is the high performance local AI stack that is designed to run on your own hardware and brings Azure AI Foundry’s power. it is build on top of Onnx Runtime and is designed to run on any hardware.
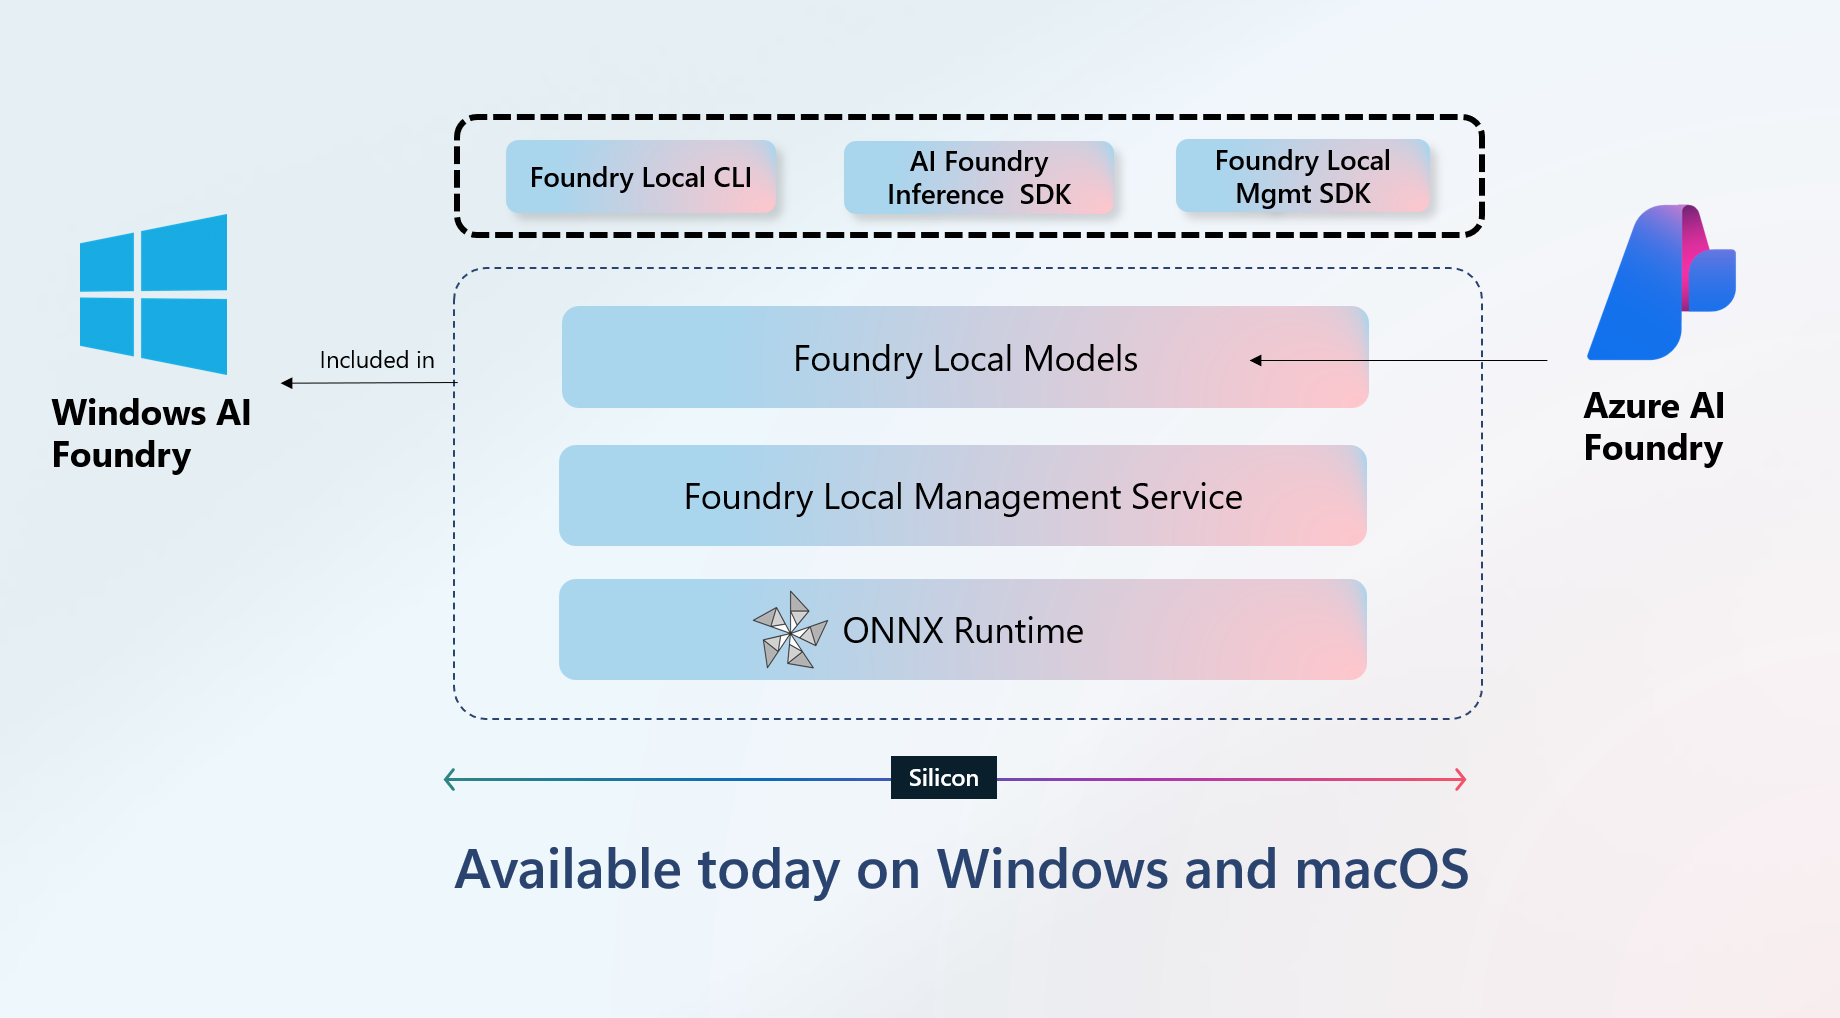
Currently, Foundry Local is available for Windows and MacOS. We will be using Windows for this post.
Installing Foundry Local
To install Foundry Local, you can use the following command in your terminal:
winget install Microsoft.FoundryLocal
Alternatively, you can download the installer from the Foundry Local Github Repo.
List Available Models
Once installed, foundry command will be available in your terminal. You can use the following command to list all available models:
foundry models list
Based on the your hardware, you will see a list of available models. For example, on my machine, I can see the following models:
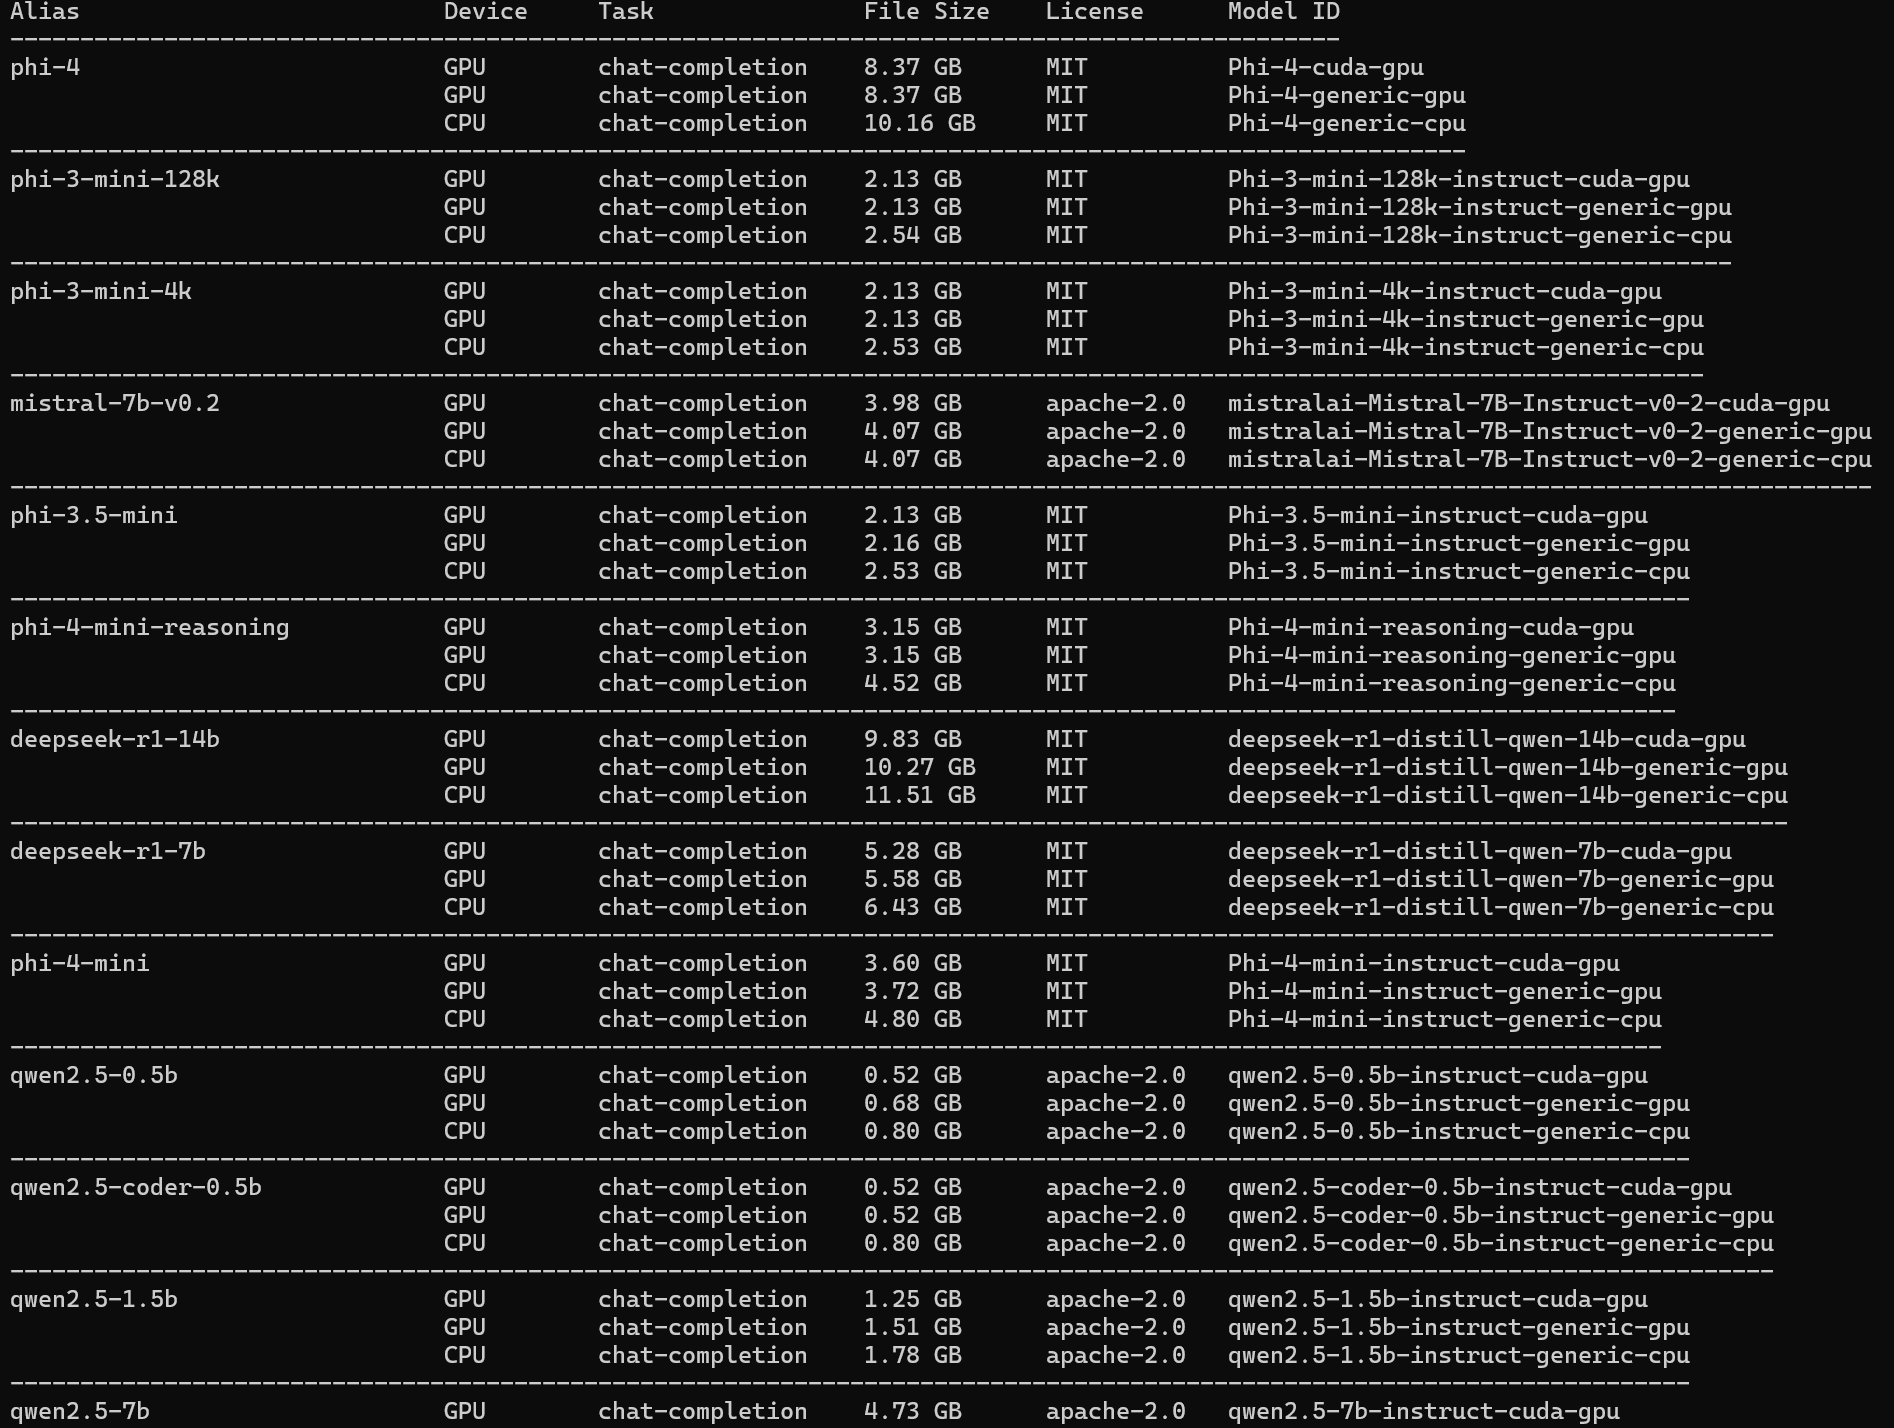
You might noticed we have separate models for gpu and cpu. when you run the model based on your hardware, it will automatically select the best model for you.
Run your first model
To run your first model, you can use the following command:
foundry model run <model_name>
For example, to run the qwen2.5-0.5b model, you can use the following command:
foundry model run qwen2.5-0.5b
Once you run the command, under the hood, it will download the model in your local machine and keep it C:\Users\%USERNAME%\.foundry\cache\models and can be used for future reference. You can also use below command to see the models downloaded in your local machine:
foundry cache ls
Once the command is executed, you will see the following output:
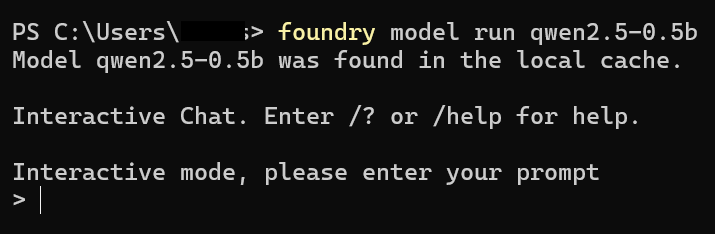
This is running in interactive mode, but we don’t want that, so will close the interactive mode by pressing Ctrl + C. and run the below command:
foundry service start
This will expose OpenAI API compatible endpoint on http://localhost:5273. You can use this endpoint from your semantic kernel application.
Setup Semantic Kernel
We will create a new minimal api project using your favorite IDE. I will be using Visual Studio.
- Open Visual Studio and create a new project.
- Select “ASP.NET Core Web API” template.
- Configure the project name and location.
- Click “Create” to generate the project.
It could be a console application as well, but I prefer to use minimal api as we will be using it from out chat application.
Add Nuget Packages
First, we need to install following nuget packages:
1
2
3
4
5
6
7
8
9
10
11
<Project Sdk="Microsoft.NET.Sdk.Web">
  <PropertyGroup>
    <TargetFramework>net9.0</TargetFramework>
    <Nullable>enable</Nullable>
    <ImplicitUsings>enable</ImplicitUsings>
  </PropertyGroup>
  <ItemGroup>
    <PackageReference Include="Microsoft.AspNetCore.OpenApi" Version="9.0.5" />
    <PackageReference Include="Microsoft.SemanticKernel.Connectors.OpenAI" Version="1.54.0" />
  </ItemGroup>
</Project>
Add Connector and Kernel
Next step is to add the OpenAI connector and Kernel to the ServiceCollection in Program.cs file. You can use the following code to do that:
1 |
|
Add Chat Completion Endpoint
Next step is to add the chat completion endpoint to the Program.cs file. You can use the following code to do that:
1 |
|
Let’s break down the code:
- We are using
MapPostto create a new endpoint/api/chatthat will handle chat requests. - We are using
text/event-streamto set the response type for streaming, which is used for server-sent events. - We are using
IChatCompletionServiceto get the chat service for the model we are using from Kernel. - We are using
ChatHistoryto keep track of the chat history. Initially, we are setting the system message toYou are helpful assistant.. Notice that, we are using global variablechatHistoryfor demo purpose, later post we will use a better approach to manage the chat history. - We are using
AddUserMessageto add the user message to the chat history. - We are using
GetStreamingChatMessageContentsAsyncto get the streaming chat message contents from the LLM. - We are using
JsonSerializerto serialize the response and send it back to the client. - Finally, we are using
AddAssistantMessageto add the assistant message to the chat history. So that follow up questions can be asked. - We are using
cancellationTokento cancel the request if needed.
Let’s see it in action.
The UI is a chat application built using Blazor, will explain it in detail in some future post. For now, you can see that we are able to get the response from the LLM using Foundry Local and Semantic Kernel.
Probably, you have noticed that the follow up question do not makes sense if the user is not providing any context. Since we are using ChatHistory to keep track of the chat history, we can use it to provide context to the LLM.
Outro
In this post, we have discussed how to use Foundry Local with Semantic Kernel. We have seen how to install Foundry Local, run a model, and use it with Semantic Kernel.
Will I be using Foundry Local in my future posts? probably not because of the following reasons:
- This is in public preview.
- Model catalog has limited models available.
- The above, can be solved but for that we need to download the models from Hugging Face and have to go through the process of converting them to Onnx format using python. This is a bit tedious process especially when you are .NET developer and you want to focus on building applications.
- Though the api is OpenAI compatible, structured output is not supported yet.
- Onnx model hosted on Hugging Face are not optimized for Foundry Local yet. However, we have the confirmation from the awesome team of Foundry Local that they are working on it and will be available soon.
I will keep an eye on the Foundry Local and will update this post when I have more information.
Next post will talk about Ollama and LM Studio. We will see how to use them with Semantic Kernel and build a chat application.
