Hi Everyone!
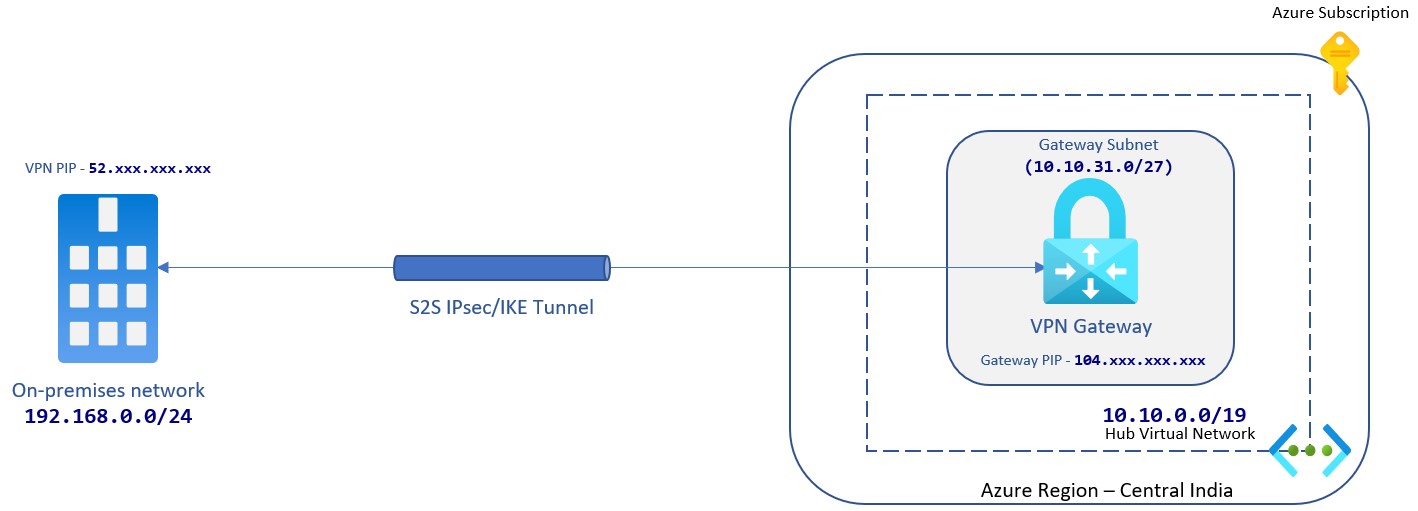
In this post, we are going to create a VPN Gateway and then we will try to connect our on-premise network to Azure cloud over VPN connection.
Based on your requirement you can either choose Site-to-Site VPN connection or Point-to-Site VPN connection. As I mentioned in previous post, VPN device is required for S2S connection, here in this post we will implement P2S connection which do not need any device.
Site-to-Site VPN Connection
While using this option, communication between on-prem and Azure Vnet is always up. It connects over an IPsec/IKE (IKEv1 or IKEv2) VPN tunnel. This type of connection requires a VPN device located on-premises that has an externally facing public IP address assigned to it.
Point-to-Site VPN Connection
While using this option, you need to establish connection between on-prem and Azure Vnet manually every time you want to access from your workstation. If you shutdown your workstation, connectivity will be lost. It connects over SSTP or IKEv2 VPN tunnel.

Mostly I will use azure powershell module to automate all resources in azure. We will start by creating Hub Virtual Network(hub-vnet), with address space 10.10.0.0/19. We will also create a subnet ManagementSubnet under hub virtual network with address space 10.10.1.0/24.
$LocationName = "centralindia"
$ResourceGroupName = "network-sandbox"
$vnetName = "hub-vnet"
$defaultSubnet = "ManagementSubnet"
$vnetAddressSpace = "10.10.0.0/19"
$subnetvnetAddressSpace = "10.10.1.0/24"

$virtualNetwork = New-AzVirtualNetwork `
                     -ResourceGroupName $ResourceGroupName `
                     -Location $LocationName `
                     -Name $vnetName `
                     -AddressPrefix $vnetAddressSpace

$subnetConfig = Add-AzVirtualNetworkSubnetConfig `
                   -Name $defaultSubnet `
                   -AddressPrefix $subnetvnetAddressSpace `
                   -VirtualNetwork $virtualNetwork


$virtualNetwork = $virtualNetwork | Set-AzVirtualNetwork
Next, we need to create the VPN gateway. To create VPN gateway the first requirement is to have GatewaySubnet in hub-vnet. Also we will need public ip for it. I’m taking RouteBased vpn type and Basic Sku. Below script takes care of creating gateway subnet in hub-vnet and creating vpn gateway. This steps can take around 45 minutes and it depends on Sku type.
$vnetName = "hub-vnet"
$gwAddressSpace = "10.10.31.0/27"
#Get basic details
$LocationName = "centralindia"
$ResourceGroupName = "network-sandbox"

$hubVnet = Get-AzVirtualNetwork `
              -Name $vnetName

$gwSubnet = Add-AzVirtualNetworkSubnetConfig `
                          -Name "GatewaySubnet" `
                          -AddressPrefix $gwAddressSpace `
                          -VirtualNetwork $hubVnet

$updateHubVnet = Set-AzVirtualNetwork `
                    -VirtualNetwork $hubVnet

$gwpip    = New-AzPublicIpAddress `
               -Name "GateWayPIp" `
               -ResourceGroupName $ResourceGroupName `
               -AllocationMethod "Dynamic" `
               -Location $LocationName

$gwSubnet   = Get-AzVirtualNetworkSubnetConfig -Name 'GatewaySubnet' `
               -VirtualNetwork $updateHubVnet

$gwipconf = New-AzVirtualNetworkGatewayIpConfig -Name "VPNGatewayIp" `
               -Subnet $gwSubnet -PublicIpAddress $gwpip

New-AzVirtualNetworkGateway -Name "AzVpn" -ResourceGroupName $ResourceGroupName `
                            -Location $LocationName -IpConfigurations $gwipconf -GatewayType Vpn `
                            -VpnType RouteBased -GatewaySku Basic
Once VPN Gateway is created, at this point either you can configure Site to Site connectivity or Point to Site connectivity. We will take P2S approach.
Azure uses certificate to authenticate VPN client. Each workspace that you connected to hub-vnet must have the client certificate installed. Now to generate a client certificate first you need to create a root certificate and you upload the public key information to Azure. The root certificate then considered as trusted. You also need to generate the client certificate from the same trusted root certificate and as I mentioned earlier you need to install it on each workspace from where you want to connect hub-vnet.
Either you can use your existing certificate chain or you can generate self signed certificate. In this post I will go with self signed certificate.
First, you will need to create root certificate and store it in current user.
$certStoreLocation = "Cert:\CurrentUser\My"

#Create a self-signed root certificate

$cert = New-SelfSignedCertificate -Type Custom -KeySpec Signature `
                                -Subject "CN=P2SRootCa" `
                                -KeyExportPolicy Exportable `
                                -HashAlgorithm sha256 -KeyLength 2048 `
                                -CertStoreLocation $certStoreLocation `
                                -KeyUsageProperty Sign `
                                -KeyUsage CertSign
Next, create a client certificate signed by root certificate we just created, which needs to be installed every workstation from where you want to connect hub-vnet.
#Generate a client certificate

New-SelfSignedCertificate -Type Custom -DnsName "P2SRootClient" -KeySpec Signature `
                            -Subject "CN=P2SRootClient" -KeyExportPolicy Exportable `
                            -HashAlgorithm sha256 -KeyLength 2048 `
                            -CertStoreLocation $certStoreLocation `
                            -Signer $cert -TextExtension @("2.5.29.37={text}1.3.6.1.5.5.7.3.2")
It’s time to download the VPN client, so to download, you need to upload public key information of root certification to azure also you need to mention address pool for your vpn client so that it can reserves a pool of IP addresses for VPN clients.
$ResourceGroupName = "network-sandbox"
$GatewayName="AzVpn"
$Gateway=Get-AzVirtualNetworkGateway -Name $GatewayName -ResourceGroupName $ResourceGroupName
$VPNClientAddressPool="192.168.0.0/24"
$rootCaBase64 = [system.convert]::ToBase64String($cert.RawData)
#Disabling BGP
$Gateway.BgpSettings =$null
#Setting the VPN Client Address Pool
Set-AzVirtualNetworkGateway -VirtualNetworkGateway $Gateway -VpnClientAddressPool $VPNClientAddressPool
#Uploading the Certificate to the gateway
Add-AzVpnClientRootCertificate -VpnClientRootCertificateName "P2SRootCA" `
-VirtualNetworkGatewayname $GatewayName `
-ResourceGroupName $ResourceGroupName `
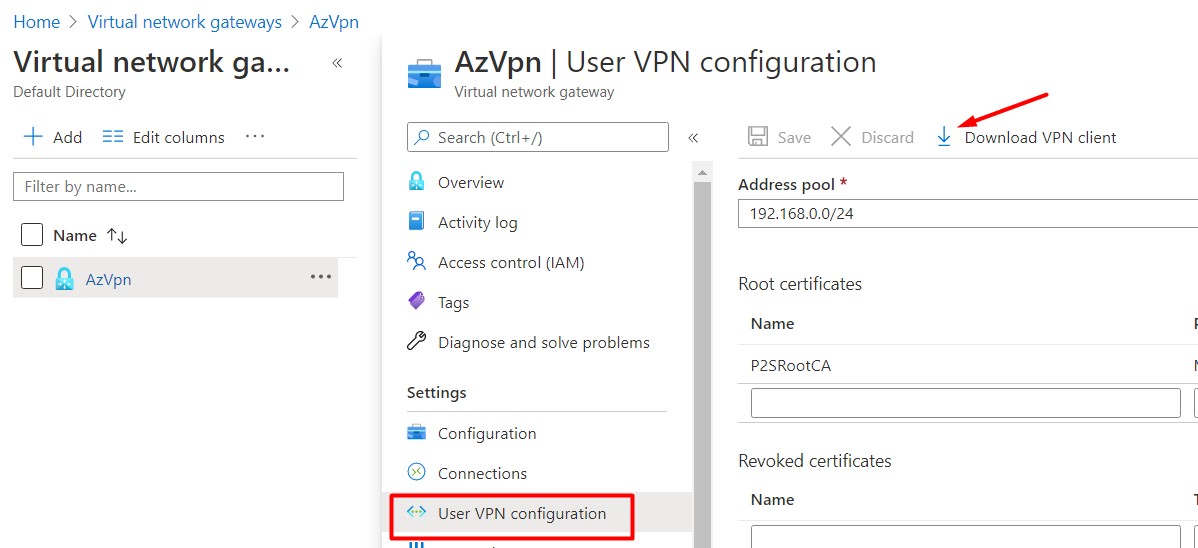
-PublicCertData $rootCaBase64Once done, go to azure portal select your vpn you just configured and then go to “User VPN configuration”. Download and based on your system architecture (x86 or x64) install it on your workspace.
If you are using Windows 10 you should have something like this after connecting with VPN -
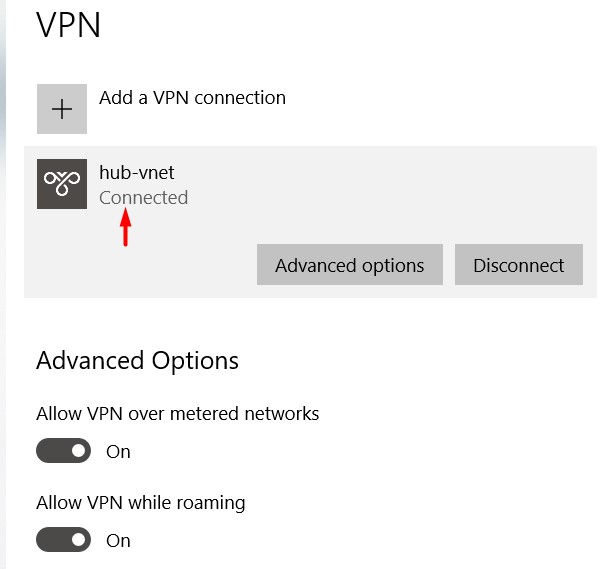
At this point you have encrypted connection to hub-vnet using private ips over public internet. In next post, I will deep dive into Hub-Spoke topology also we will create JumpBoxes and connect over VPN.
Comments