
Security is the ❤️ of any application but sometimes we need to balance security with usability. Sometimes you want to allow users to access a resource with a lower level of authentication by just entering username and password. But if the user wants to access a resource with a higher level of authentication, then you want to ask the user to enter a second factor of authentication.
For instance, if you are building a money transfer application, you want to allow users to view transaction history or adding a new beneficiary with just a username and password. But if the user wants to transfer money, then you want to ask the user to enter a second factor of authentication like a one-time password or a fingerprint. This is called step-up authentication.
In this article, we will see how to implement step-up authentication with Auth0 in .NET 7.
Table of Contents
Why did I choose .NET 7?
Sometime back, ASP.NET Core team released .NET 7 RC 1, where they have introduced a lot of new features. One of the new features is Dynamic Authentication in Blazor WebAssembly.This allows us to crete dynamic authentication requests at runtime with custom parameters to handle more advanced authentication scenarios. To specify additional parameters, we will use new InteractiveRequestOptions type and NavigateToLogin helper methods on NavigationManager.
However, this feature can be used with any .NET framework. But I choose .NET 7 because it is the latest version of .NET and it is almost ready. So, I thought it would be a good idea to try out this feature with .NET 7.
What is Auth0?
Auth0 is a cloud-based identity management platform that provides authentication, authorization, and user management for web, mobile, IoT, and internal applications. It supports a variety of identity protocols, including OAuth 2.0, OpenID Connect, and SAML. Auth0 also provides a free tier for developers to get started with authentication.
How it works?
Let’s go back to the example of money transfer application. If user wants to see transaction history or add a new beneficiary, then we will allow the user to access the resource with just a username and password which are in our scenario is low risk resource. But if the user wants to transfer money which is in our scenario a high risk resource, will trigger a stronger authentication mechanism like MFA.
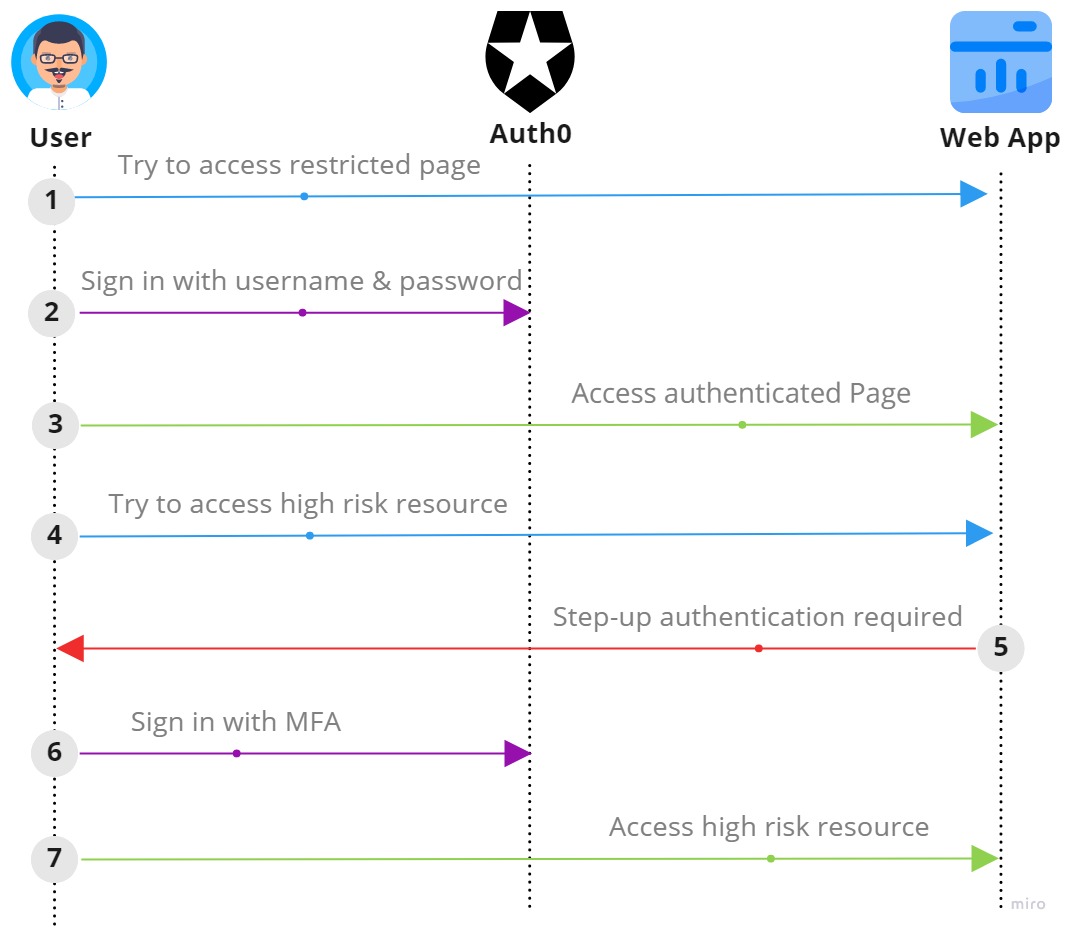
In the above diagram, a user tries to access restricted page which redirects to the login page. User provides valid credentials and gets authenticated and returns back to the application with id_token and access_token (we will not focus on this).
id_token contains information relevant to the user’s session in the form of claims. It might contain information like the user’s name, email address, and so on but we will only focus on below claims -
| Claim | Description |
|---|---|
| exp | Token expiration |
| iss | Token issuer |
| amr | Authentication Method Reference Values |
| aud | Intended recipient of the token |
If amr does not exist in the payload or does not contain the value mfa, the user did not log in with MFA. If amr exists in the payload and mfa contains the value , then the user did log in with MFA.
1 |
|
Pre-requisites
For this scenario, you must configure the following items in the Auth0 dashboard.
- Register a web app.
- Create a database connection.
- Enable MFA to use push notifications.
We also need to create a Blazor WebAssembly application and make sure the basic authentication is working with Auth0. If you are not familiar with implementation, you can refer to this article.
Once we have the basic authentication working and pre requisites are configured, we can start implementing step-up authentication.
Create Rule
First we need to create a rule that challenges the user to authenticate with MFA when the web app requests it. To create a rule, go to the Auth0 dashboard and click on Rules under Auth Pipeline. Click on Create Rule and select Empty Rule template which will contains below code -
1 |
|
-
The CLIENTS_WITH_MFA variable holds the Client IDs of all the applications you want to use this rule. (You can remove this (and the if statement that follows) if you don’t need it.)
-
The context.request.query.acr_values property contains the context class that the Authorization Server is being requested to use when processing requests from the application. It only exists when the application includes it in the authentication request. In the next section, we will see how our web app will include it in the authentication request, but only when a user who has not already authenticated with MFA tries to transfer money. Our web will set a value of
http://schemas.openid.net/pape/policies/2007/06/multi-factor, which indicates that we want the Authorization Server to require MFA, and the context.multifactor property value that we set in our code will specify MFA via whatever method the user has configured.
Configure web app
Now we need to configure our web app. We will make use of AuthenticationStateProvider to check if the user has logged in with MFA. If the user has not logged in with MFA, we will redirect the user to the login page with acr_values parameter set to http://schemas.openid.net/pape/policies/2007/06/multi-factor. This will trigger the rule we created in the previous section.
1 |
|
Here NavigateToMFA is a extension of NavigationManager. Let’s create a extension method to redirect the user to the login page with acr_values parameter set to http://schemas.openid.net/pape/policies/2007/06/multi-factor.
1 |
|
Once the user authenticates with MFA, the web app receives the authorization code, which will be exchanged for the new ID token, which should now contain the amr claim with a value of mfa.
Conclusion
The building blocks for step-up authentication are already available in open standards. you just need to know how to use them. Consciously, I have skipped a lot of details in this article. I have tried to explain the concept in a simple way. You might find this article helpful to understand in detail. You can use Auth0 or any other identity provider to implement this if that follows the open standards. I hope you find it useful. If you have any questions or suggestions, please leave a comment below.
You can find the source code here.
