Implementing Hub-Spoke network topology in Azure - Part 2
Hi Everyone!
This post is continuation of how to series about Hub-Spoke network topology in Azure. Over the time, I will updated this page with links to individual posts :
Implementing Hub-Spoke network topology in Azure - Part 1
This Post - Implementing Hub-Spoke network topology in Azure - Part 2
Introducing Azure Firewall in Hub-Spoke network topology in Azure
Coming Soon - Implementing Azure Firewall in Hub-Spoke network topology in Azure
Coming Soon - Connect your Hub with your On-Prem
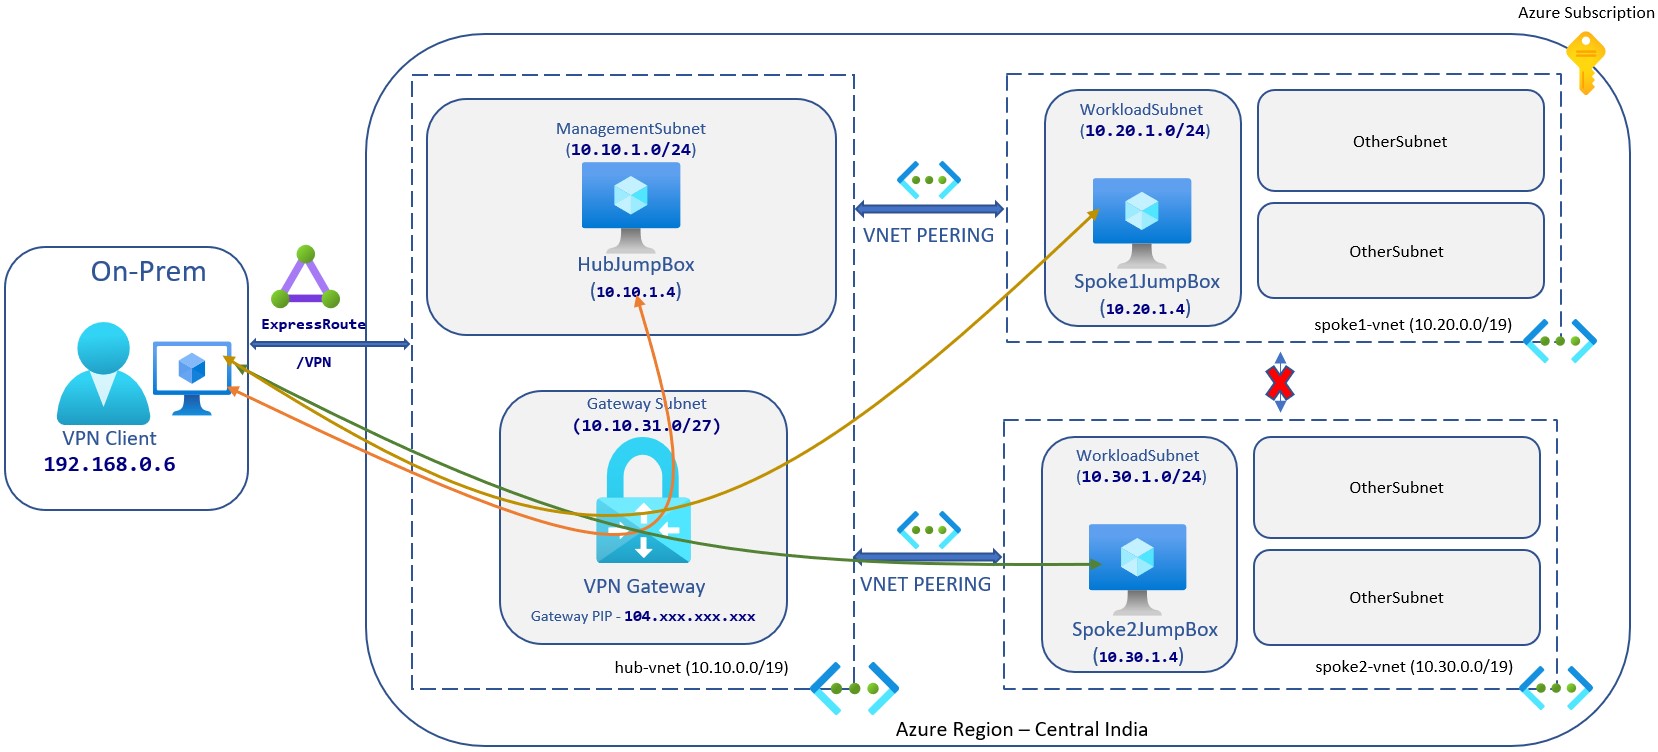
Now, we know the context of this topology and architecture let’s start to implement it. In this post, I am going to use azure portal for creating the virtual networks and azure powershell module to create JumpBox in different virtual networks.
We will start by creating Hub Virtual Network(hub-vnet), with address space 10.10.0.0/19. We will also create a subnet ManagementSubnet under hub virtual network with address space 10.10.1.0/24
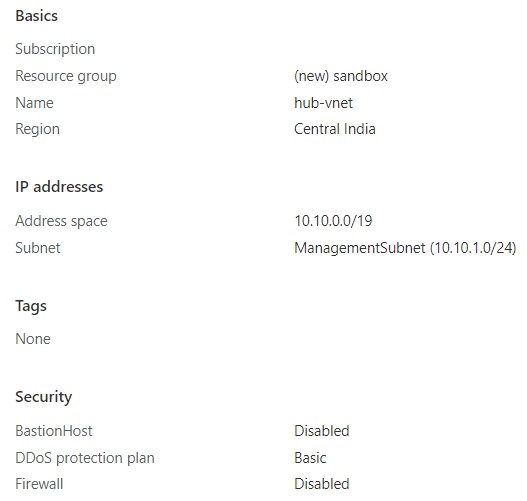
Please note, I have selected DDoS protection plan as Basic, but it is highly recommended to enable DDoS protection plan for your production environment and this is applicable for all of your virtual networks.
Let’s create Spoke 1 Virtual Network(spoke1-vnet), with address space 10.20.0.0/19. We will also create a subnet WorkloadSubnet under Spoke1 virtual network with address space 10.20.1.0/24

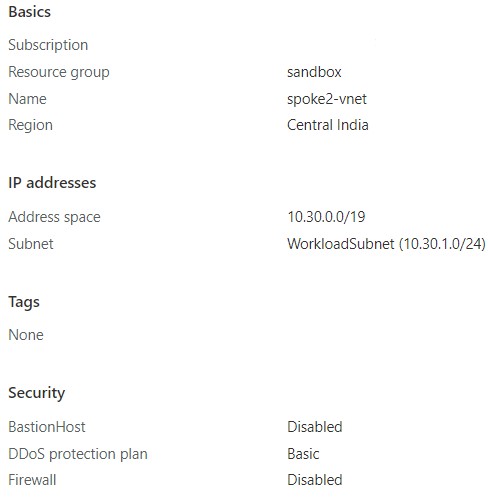
Next create Spoke 2 Virtual Network(spoke2-vnet), with address space 10.30.0.0/19. We will also create a subnet WorkloadSubnet under Spoke1 virtual network with address space 10.30.1.0/24
Two virtual networks can not talk to each other, so by default hub-vnet will not be able to connect with spoke1-vnet and spoke2-vnet. So, to make it work we need to enable vnet-peering between hub and spokes.
Let’s create vnet peering between hub-vnet to spoke1-vnet and vice versa, also we need to same for spoke2 vnet :
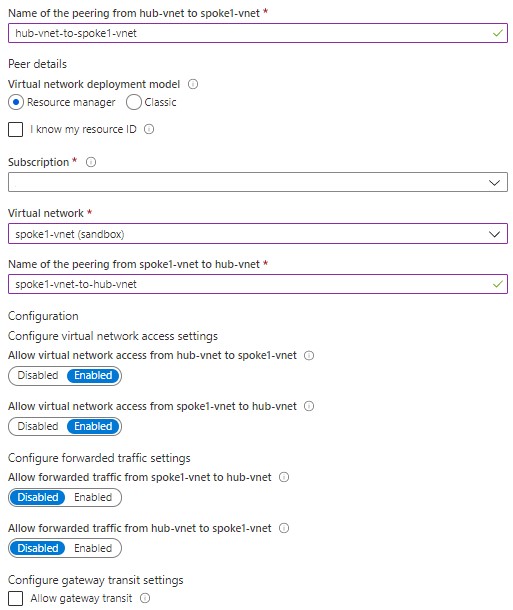
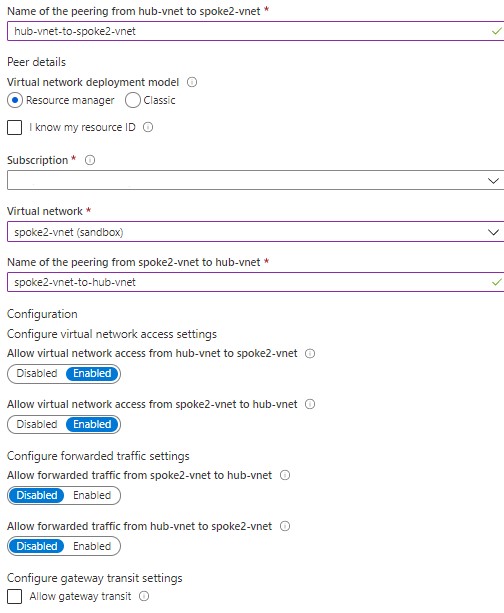
NOTE: You can also provide resource id if you do not have read access to the virtual network or subscription you wish to peer with.
Once done, peering status should show as connected :

The interesting part is I have created peering between hub and spokes but not between spoke1 and spoke2, so spoke1 and spoke2 can not communicate with each other. you can ask me, can’t we create peering between them? Yes! you can but you should not, I will try to explain the reason in next part and will show you how communication will be done between spokes if needed.
Now for testing purpose, we are going to create JumpBox with IIS enabled in 3 different virtual networks. Out of which Hub JumpBox will only have pubic ip along with private ip and other two JumpBox will only have private ip. Below single script will be used to create different virtual machines.
  1# Create Virtual Machine
  2$LocationName = Read-Host `
  3                    -Prompt 'Enter Location'
  4$ResourceGroupName = Read-Host `
  5                         -Prompt 'Enter Resource Group Name'
  6
  7$VMName = Read-Host `
  8              -Prompt 'Enter Virtual Machine Name'
  9$ComputerName = $VMName
 10$VMSize = "Standard_B1ms"
 11
 12$NetworkName = Read-Host `
 13                   -Prompt 'Enter Virtual Network Name'
 14$SubnetName = Read-Host `
 15                  -Prompt 'Enter Subnet Name'
 16
 17$NICName = "$($VMName)-Nic"
 18
 19$rdpRule = New-AzNetworkSecurityRuleConfig `
 20              -Name Rdp-Rule `
 21              -Description "Allow RDP" `
 22              -Access Allow `
 23              -Protocol Tcp `
 24              -Direction Inbound `
 25              -Priority 1000 `
 26              -SourceAddressPrefix Internet `
 27              -SourcePortRange * `
 28              -DestinationAddressPrefix * `
 29              -DestinationPortRange 3389
 30
 31$networkSecurityGroup = New-AzNetworkSecurityGroup `
 32                           -ResourceGroupName $ResourceGroupName `
 33                           -Location $LocationName `
 34                           -Name "$($VMName)-Nsg" `
 35                           -SecurityRules $rdpRule
 36
 37$Vnet = Get-AzVirtualNetwork `
 38            -Name $NetworkName
 39$SingleSubnet = Set-AzVirtualNetworkSubnetConfig `
 40                   -VirtualNetwork $Vnet `
 41                   -Name $SubnetName `
 42                   -NetworkSecurityGroup $networkSecurityGroup
 43
 44$Vnet = Set-AzVirtualNetwork `
 45           -VirtualNetwork $VNET
 46
 47$SingleSubnet = Get-AzVirtualNetworkSubnetConfig `
 48                   -VirtualNetwork $Vnet `
 49                   -Name $SubnetName `
 50
 51$NIC = Get-AzNetworkInterface `
 52          -Name $NICName
 53$PipRequired = Read-Host `
 54                   -Prompt 'Do you want to enable public ip for this virtual machine? (Press Y to Yes)'
 55
 56if($PipRequired -eq "Y"){
 57    $Pip = New-AzPublicIpAddress `
 58              -ResourceGroupName $ResourceGroupName `
 59              -Location $LocationName `
 60              -AllocationMethod Dynamic `
 61              -Sku Basic `
 62              -Name "$($VMName)-PublicIp"
 63
 64$ipconfig = New-AzNetworkInterfaceIpConfig `
 65               -Name "$($VMName)-IpConfig" `
 66               -Subnet $SingleSubnet -PublicIpAddress $Pip
 67}
 68else {
 69$ipconfig = New-AzNetworkInterfaceIpConfig `
 70               -Name "$($VMName)-IpConfig" `
 71               -Subnet $SingleSubnet
 72}
 73
 74$NIC = New-AzNetworkInterface `
 75          -Name $NICName `
 76          -ResourceGroupName $ResourceGroupName `
 77          -Location $LocationName `
 78          -IpConfiguration $ipconfig
 79
 80$Credential = Get-Credential `
 81                 -Message "Enter a username and password for the virtual machine"
 82
 83$VirtualMachine = New-AzVMConfig `
 84                     -VMName $VMName `
 85                     -VMSize $VMSize
 86
 87$VirtualMachine = Set-AzVMBootDiagnostic `
 88                     -VM $VirtualMachine `
 89                     -Disable
 90
 91$VirtualMachine = Set-AzVMOperatingSystem `
 92                     -VM $VirtualMachine `
 93                     -Windows `
 94                     -ComputerName $ComputerName `
 95                     -Credential $Credential `
 96                     -ProvisionVMAgent `
 97                     -EnableAutoUpdate
 98
 99$VirtualMachine = Add-AzVMNetworkInterface `
100                     -VM $VirtualMachine `
101                     -Id $NIC.Id
102$VirtualMachine = Set-AzVMSourceImage `
103                     -VM $VirtualMachine `
104                     -PublisherName 'MicrosoftWindowsServer' `
105                     -Offer 'WindowsServer' `
106                     -Skus '2019-Datacenter' `
107                     -Version latest
108$VirtualMachine = Set-AzVMOSDisk `
109                     -VM $VirtualMachine `
110                     -Name "$($VMName)-OsDisk" `
111                     -StorageAccountType "Standard_LRS" `
112                     -Windows `
113                     -DiskSizeInGB 127 `
114                     -CreateOption FromImage
115
116New-AzVM `
117   -ResourceGroupName $ResourceGroupName `
118   -Location $LocationName `
119   -VM $VirtualMachine `
120   -Verbose
121
122
123# Install IIS
124$PublicSettings = '{"commandToExecute":"powershell Add-WindowsFeature Web-Server"}'
125
126Set-AzVMExtension `
127        -ExtensionName "IIS" `
128        -ResourceGroupName $ResourceGroupName `
129        -VMName $VMName `
130        -Publisher "Microsoft.Compute" `
131        -ExtensionType "CustomScriptExtension" -TypeHandlerVersion 1.4 `
132        -SettingString $PublicSettings -Location $LocationName
Once completed, let’s see how data flows between hub to spokes.
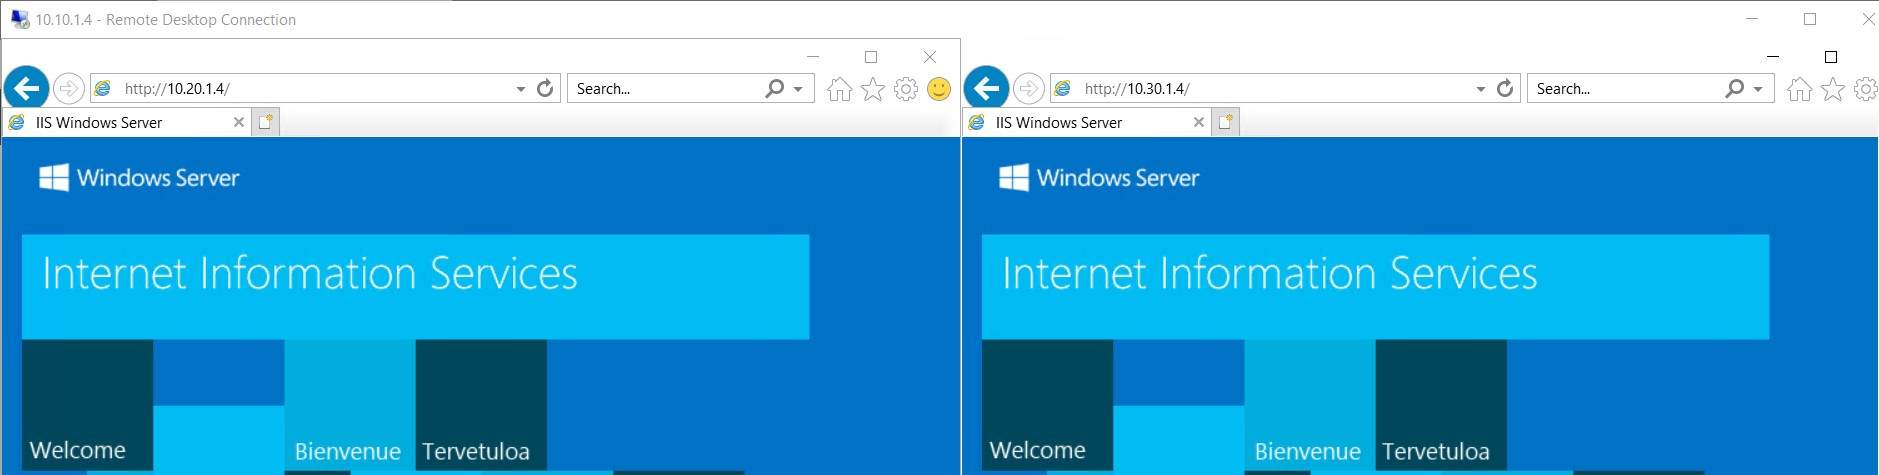
Hub To Spokes
Since, we have established the peering between Hub and spokes, these spokes are reachable from hub.
Spokes To Hub
Hub is also reachable from both spokes.
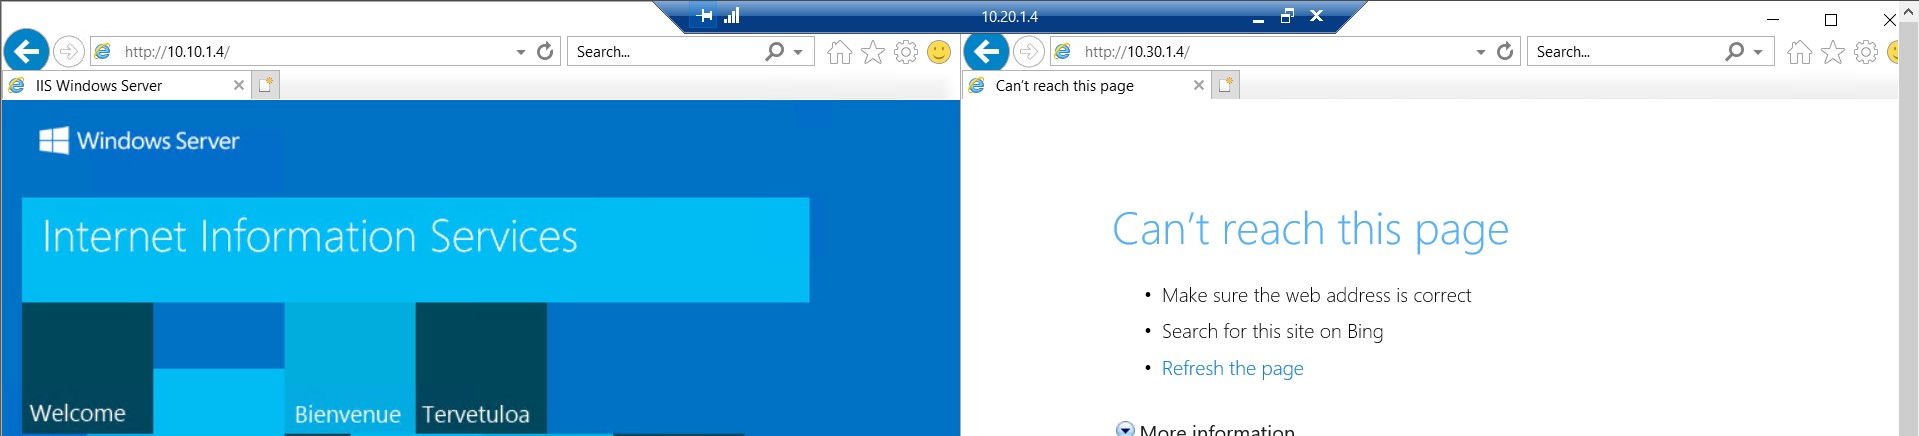
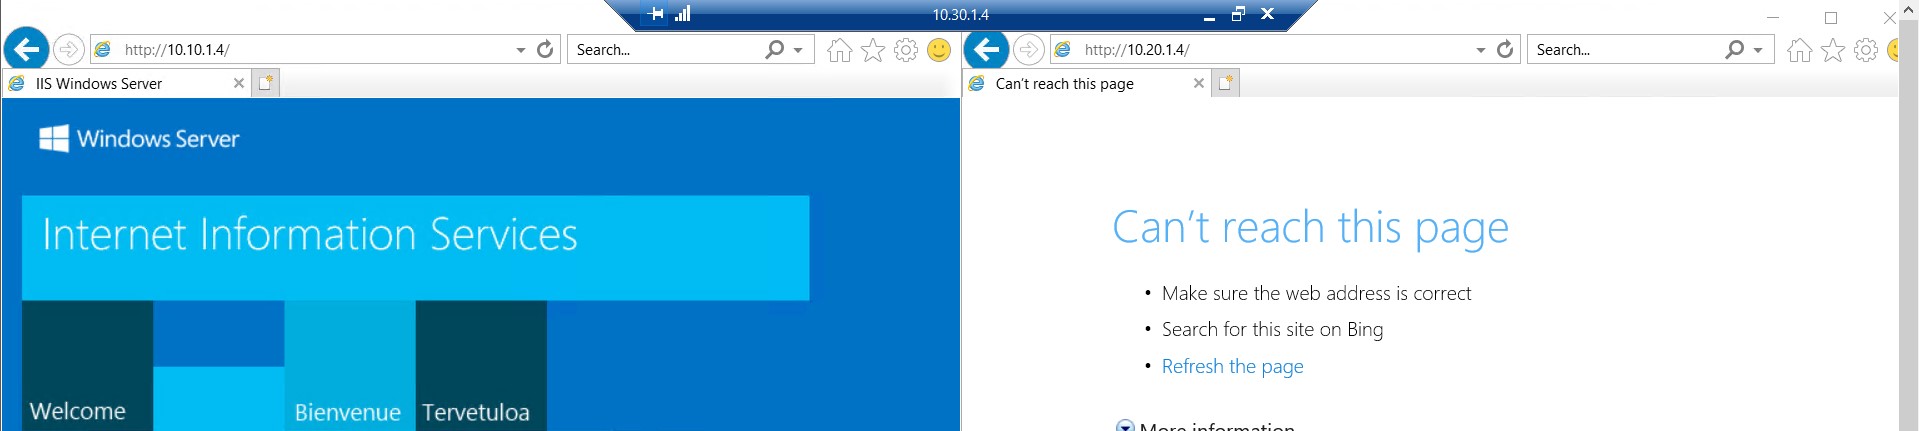
Spoke To Spoke
Interesting! if you see the above screenshot, communication between spokes are not working. Why? Let’s discuss it in the next post !
Here is the updated architecture, we just implemented -